On April 18, 2016 Splunk announced that the default root certificate used in pre-6.3 Splunk Enterprise, Splunk Light and Hunk will expire on July 21, 2016. As a result, these instances will no longer be able to communicate with each other after July 21. This Product Advisory only applies to pre-6.3 versions of Splunk. The advisory does not apply to Splunk version 6.3 or above, to those who are using their own self-signed or Certificate Authority (CA-signed) certificates, or Splunk Cloud.
If you are using Splunk 6.2 or below, you will not be impacted by the Product Advisory if you have not explicitly enabled SSL and/or certificate validation. Remember, certificate validation is disabled by default. If you are unsure if you have enabled certificate validation, you can check the server.conf file on all your Splunk instances to see if you have set the flag “sslVerifyServerCert = true”. In summary, if you have not changed any of the default configurations in server.conf and are not using TCP-SSL forwarding you have nothing to worry about.
For those who need to address the issue, Splunk offered four different recommendations including upgrading all Splunk instances to 6.3 and using that version’s default root certificates, or upgrading and using self-signed or CA-signed certificates. However, if you’re not ready to upgrade to 6.3 or use your own certificates, there is an easier route to address the issue: “Remain at your current Splunk version (pre-6.3) and manually upgrade the current default root certificates with the provided shell script that is appropriate for your operating system.”
Splunk provided some scripts to replace the current default root certificate with a new (cloned) certificate with a future expiration date. As a Splunk Elite Partner and Authorized Training Center, GTRI is providing a detailed guide (below) on how to update the soon-to-expire root certificates using a Splunk deployment server. Anyone using a deployment server knows it is a great way to push out apps and configuration to all your Splunk instances including universal forwarders, but did you know it can also be used to deploy scripts to modify files that are not managed by a deployment server? You can use this technique on any version of Splunk.
Using a Deployment Server to Modify Splunk Config Files
The first step in using the deployment server to run a script is to create an app that contains your scripts and respective .conf files. The app will leverage Splunk’s ability to use Scripted Inputs, even though you are not collecting data. Since the scripts need to be able to execute on both Windows and Linux servers running only the Universal Forwarder, they need to be written in a native scripting language such as Shell for Linux and PowerShell or Batch for Windows. Keep in mind that PowerShell is optional for Windows Server 2008 and below, and is only installed by default on Windows Server 2012 or higher.
To create an application on your deployment server that you plan on deploying to forwarders, navigate to SPLUNK_HOME/etc/apps/deployment-apps and create a folder for your app. Call it “root_cert_update”. Create two subfolders — default and bin – then navigate to the bin directory.
 ------------------
 cd SPLUNK_HOME/etc/apps/deployment-apps
 mkdir root_cert_update
 mkdir root_cert_update/default
 mkdir root_cert_update/bin
 cd root_cert_update/bin/
 ------------------
Splunk has already provided a PowerShell and a Shell script in the Product Advisory notice that will replace the current default root certificate with a new (cloned) certificate that expires in the future. Download these scripts to your bin directory. If you are creating your own, make sure you set the executable bit if needed.
 ------------------
 wget http://download.splunk.com/products/certificates/renewcerts-2016-05-05.zip
 unzip renewcerts-2016-05-05.zip
 rm renewcerts-2016-05-05.zip
 ------------------
Since the Universal Forwarders need a wrapper script to execute PowerShell, create one called “s-renewcerts.cmd” and specify any options needed to execute the original PowerShell script. The Shell script does not need a wrapper so you can specify the required options in your inputs.conf file.
 ------------------
 cat << EOF > s-renewcerts.cmd
 @echo off
 powershell -ExecutionPolicy ByPass -File "%SPLUNK_HOME%\etc\apps\root_cert_update\bin\s-renewcerts.ps1" -defaultCA -liveCA -serverCert -opensslConf "%SPLUNK_HOME%\openssl.cnf" -splunkHome "%SPLUNK_HOME%"
 EOF
 ------------------
The next step is to create an inputs.conf file that will execute the scripts downloaded from Splunk, including the wrapper script. This can be created in either the default or local directories (the example below uses the default directory).
 ------------------
 cd ../default
 cat << EOF > inputs.conf
 [script://./bin/s-renewcerts.sh -defaultCA -liveCA -serverCert]
 disabled = False
 index = _internal
 interval = 300
[script://.\bin\s-renewcerts.cmd]
 disabled = False
 index = _internal
 interval = 300
 EOF
 ------------------
The inputs.conf file contains two stanzas, one for the Linux Shell script and one for the Windows script. The required options for the Shell script are in the stanza; this is not needed for the Windows script since they are included in the wrapper script. Be sure to review the README file included with the script from Splunk as you may want to change the options being used. Specifying the index “_internal” will capture any stdout into the _internal index. By default, stderr is already written to the _internal index. This will allow you to search the _internal index by host and know which forwarders executed the script and if it was successful or not. You can set the interval to -1 to have the script executed only once when the forwarder is started, but since Splunk designed the scripts to return a message notifying the user if the default root certificate is already upgraded you should set the interval to 300 seconds (5 minutes) to ensure you receive this message as a way to verify the update was successful.
Now that the app is complete, reload the deployment server so it detects the new app.
 ------------------
 SPLUNK_HOME/bin/splunk reload deploy-server
 ------------------
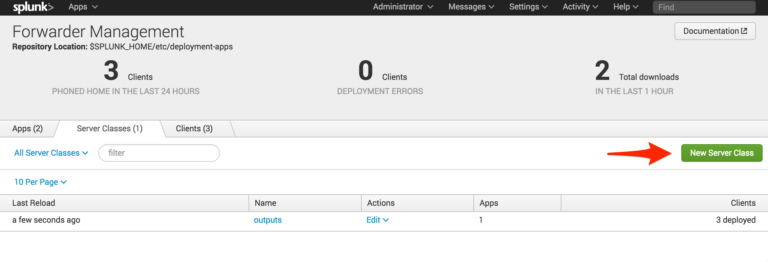
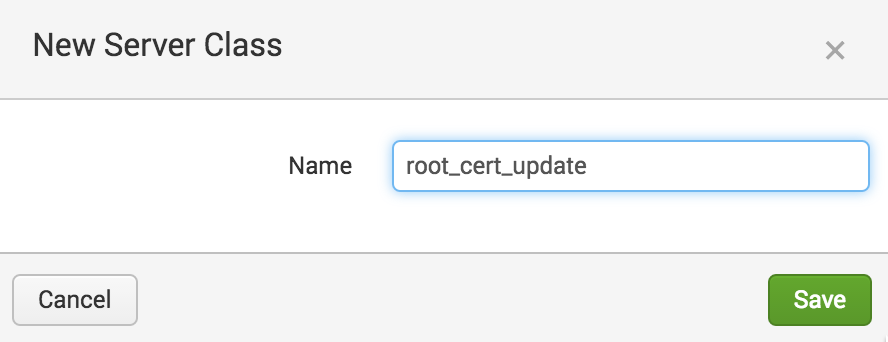
The next step is to create a dedicated Server Class for the new app (using a dedicated server class keeps everything separate from the normal configuration). Navigate to Forwarder Management using the deployment server’s web interface and click “New Server Class.” Call the new server class “root_cert_update”.

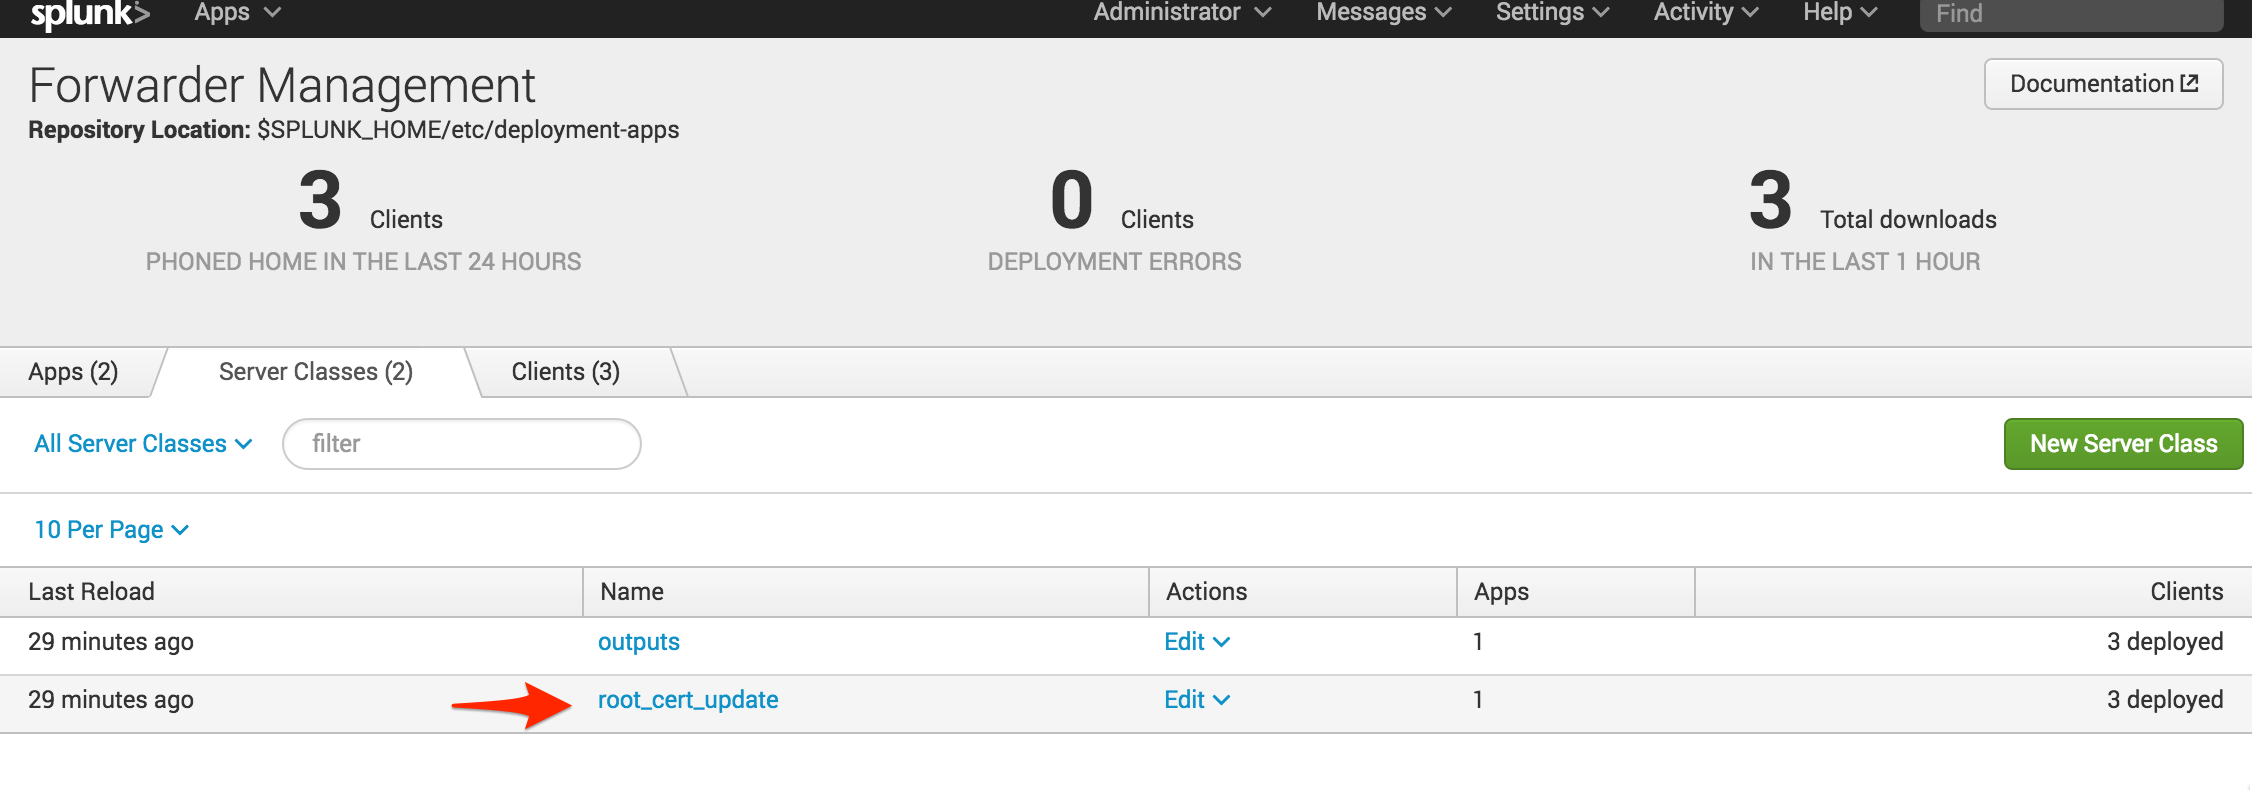
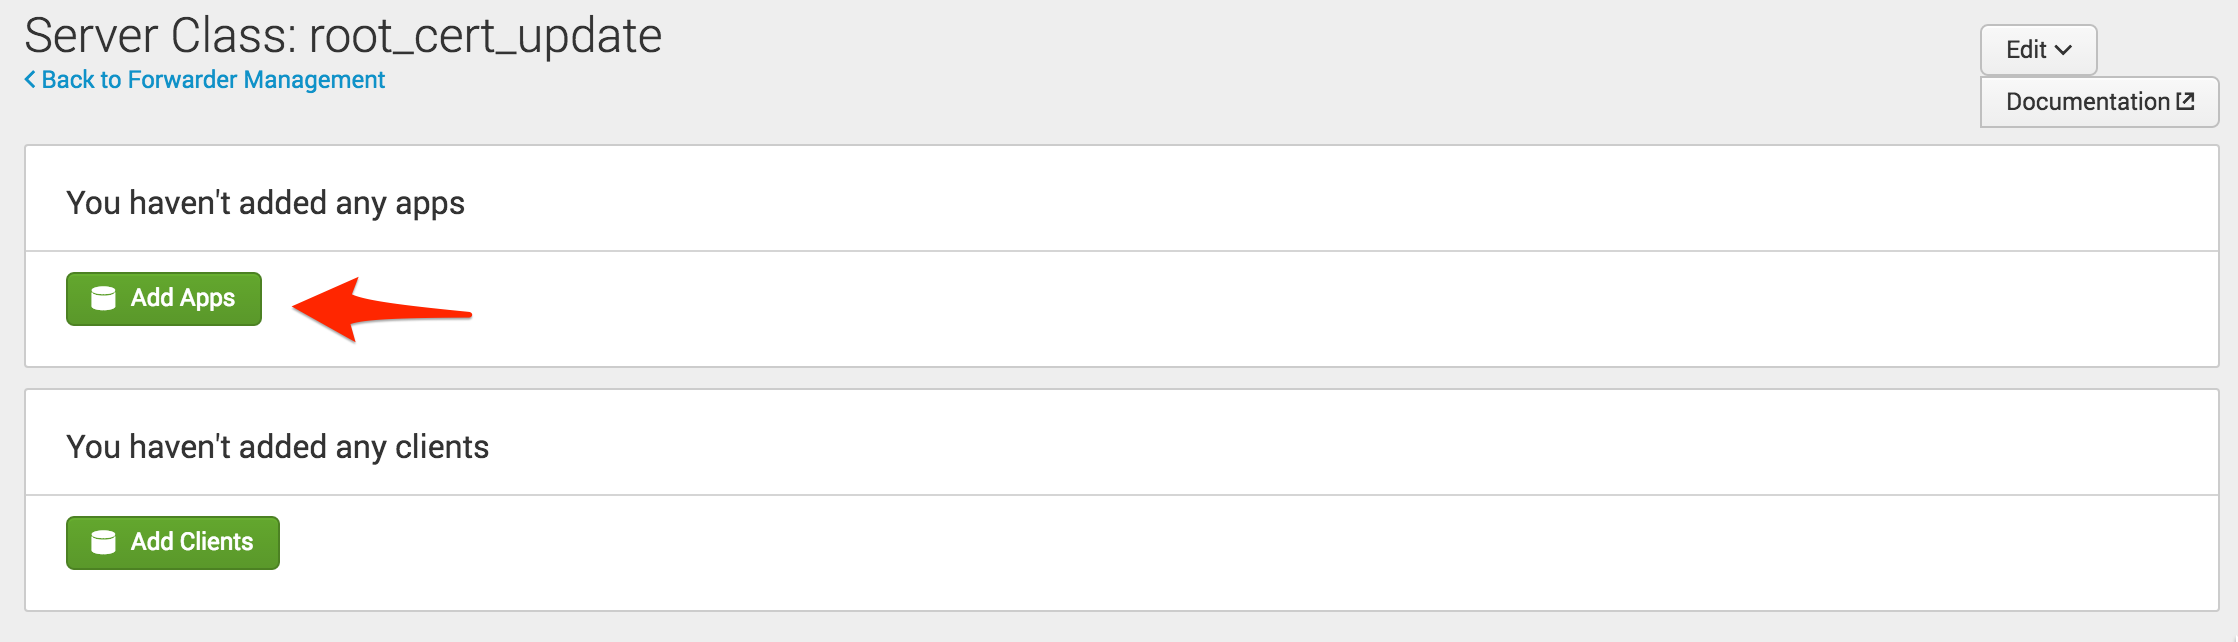
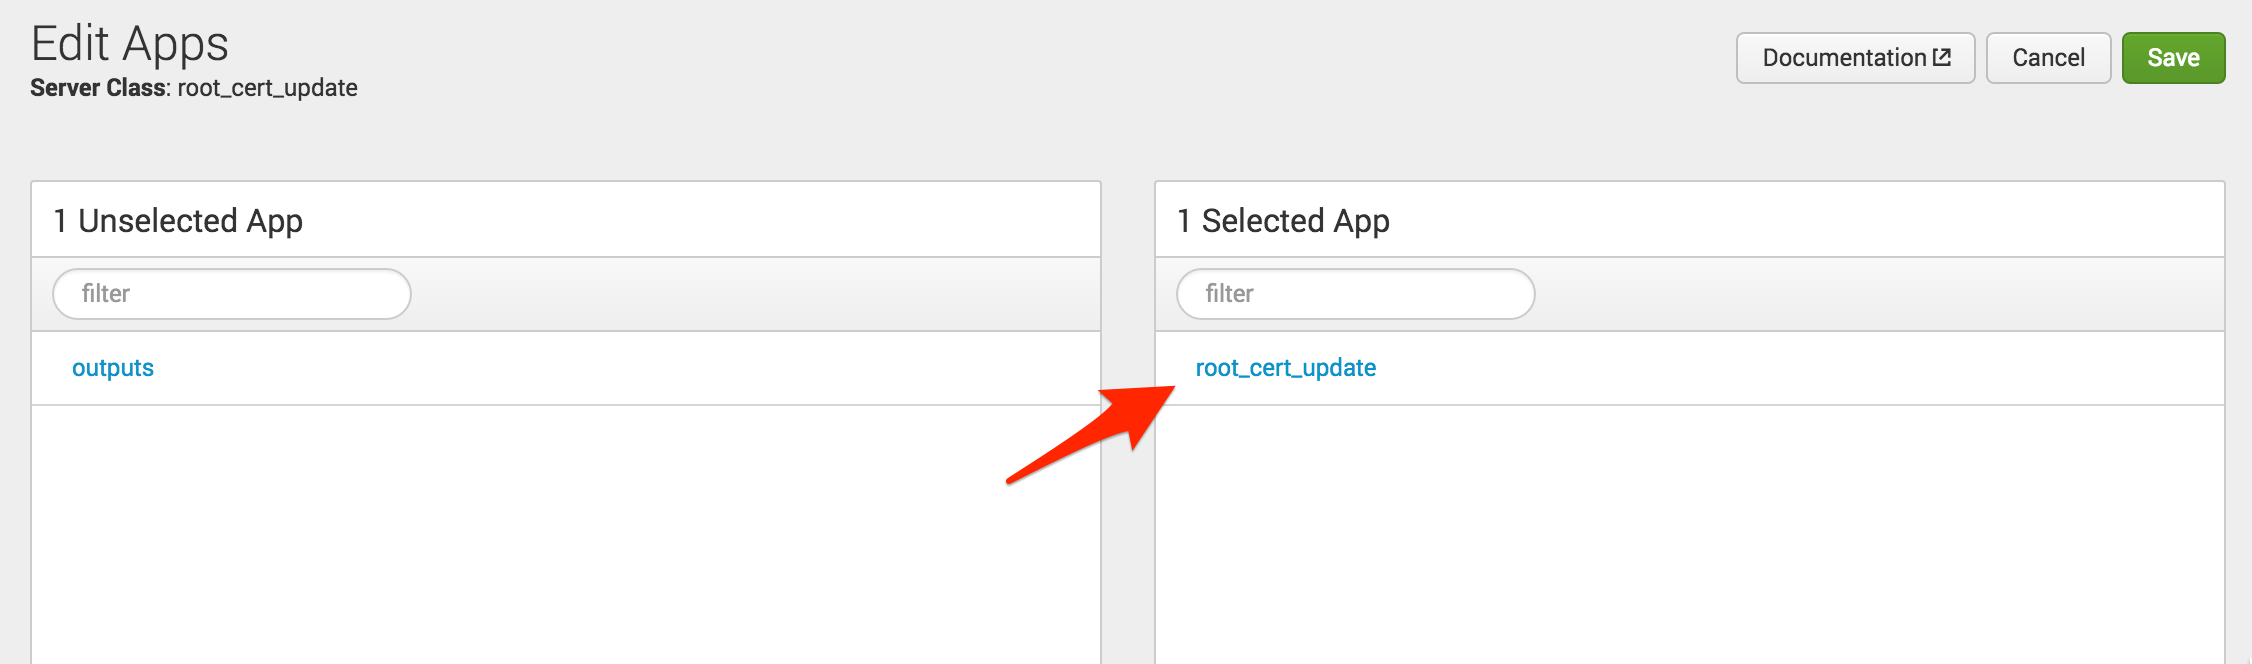
The next step is to add the new app. Note that no clients have been added yet; you need to ensure that the app is flagged to restart Splunkd. To do this, click on the new server class, select “Add Apps,” click on the new app so it moves to the right of the screen under “Selected App” and click “Save.”
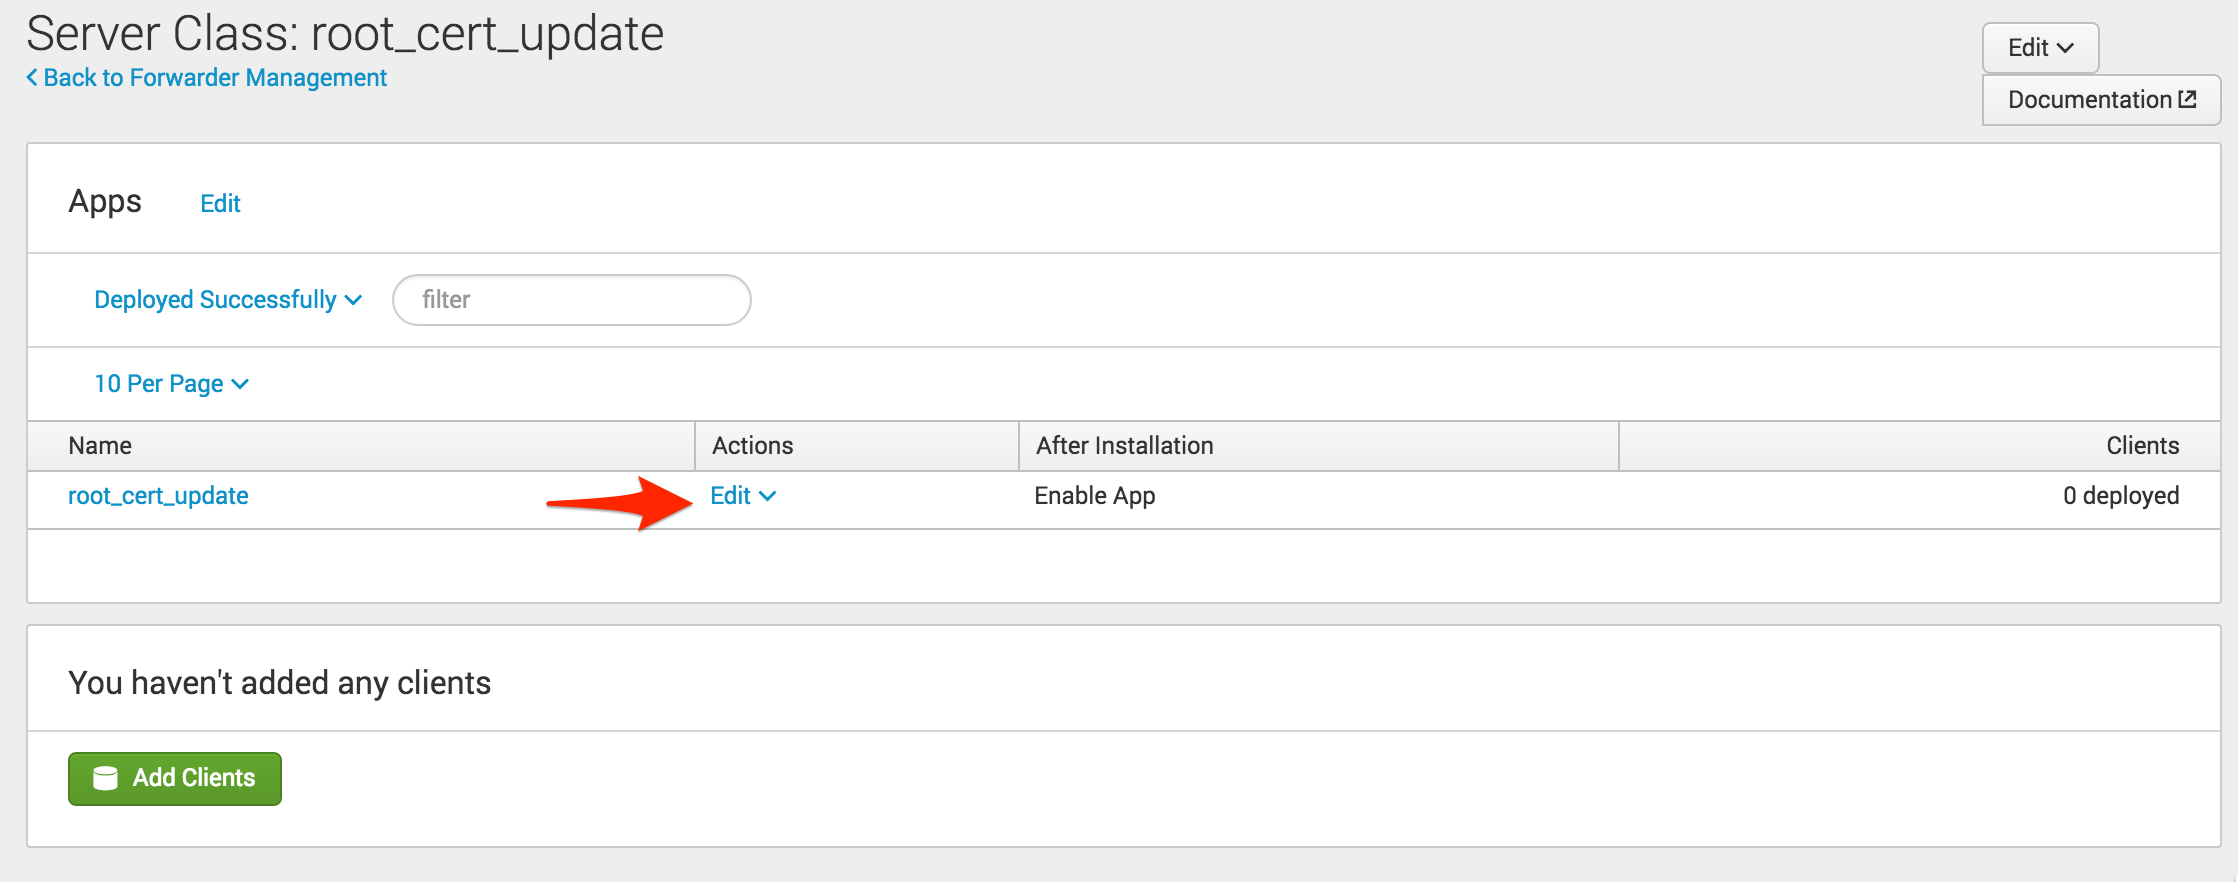
Now that the app has been added to the server class, you need to tell Splunk to restart the Splunkd process. Select “Edit” under the Actions column, check “Restart Splunkd,” and click “Save.” Now you are ready to deploy the new app to your clients. Remember, clients can be any instances of Splunk that use the deployment server. If you have Splunk instances that are not a member of a deployment server, such as the deployment server itself, you will need to install the app using a different method.

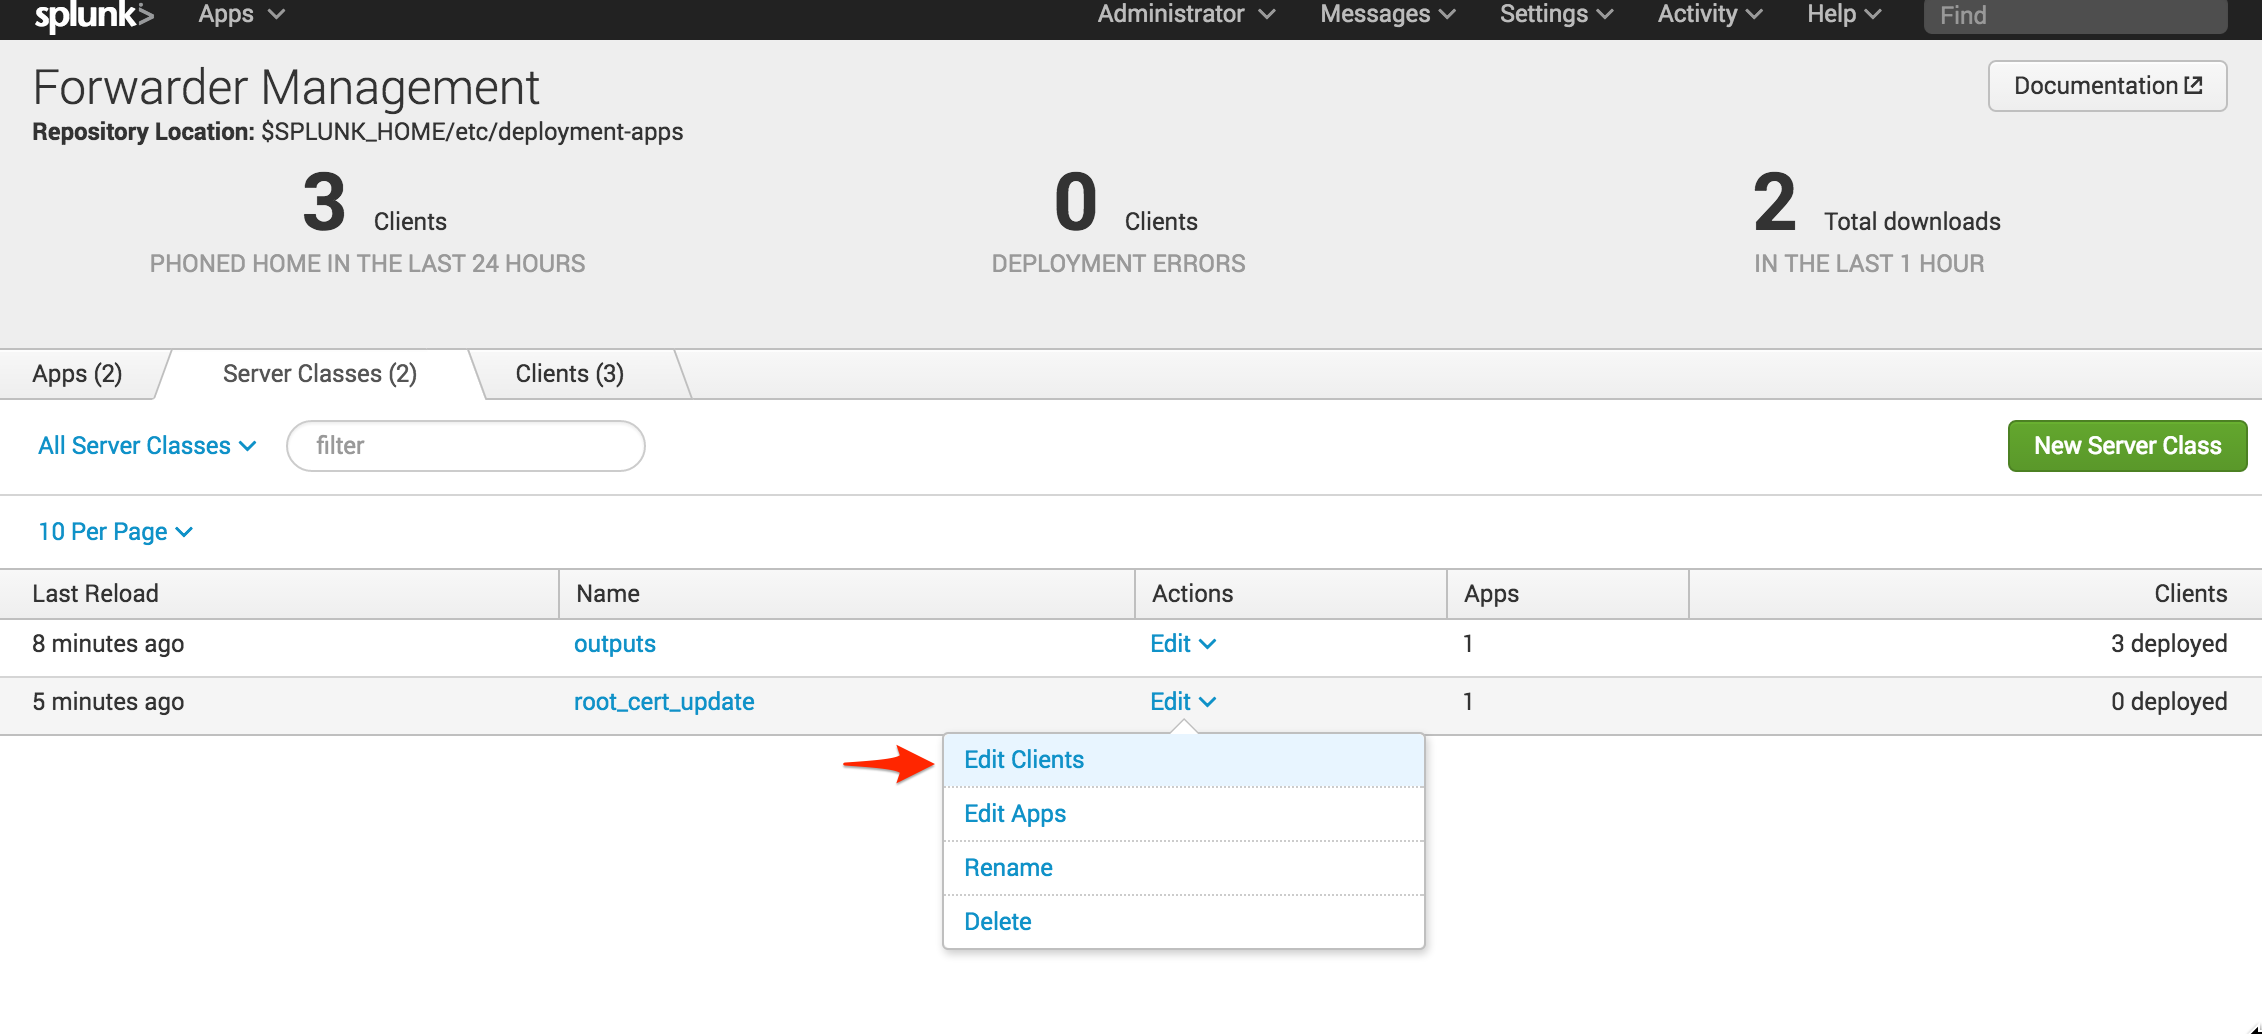
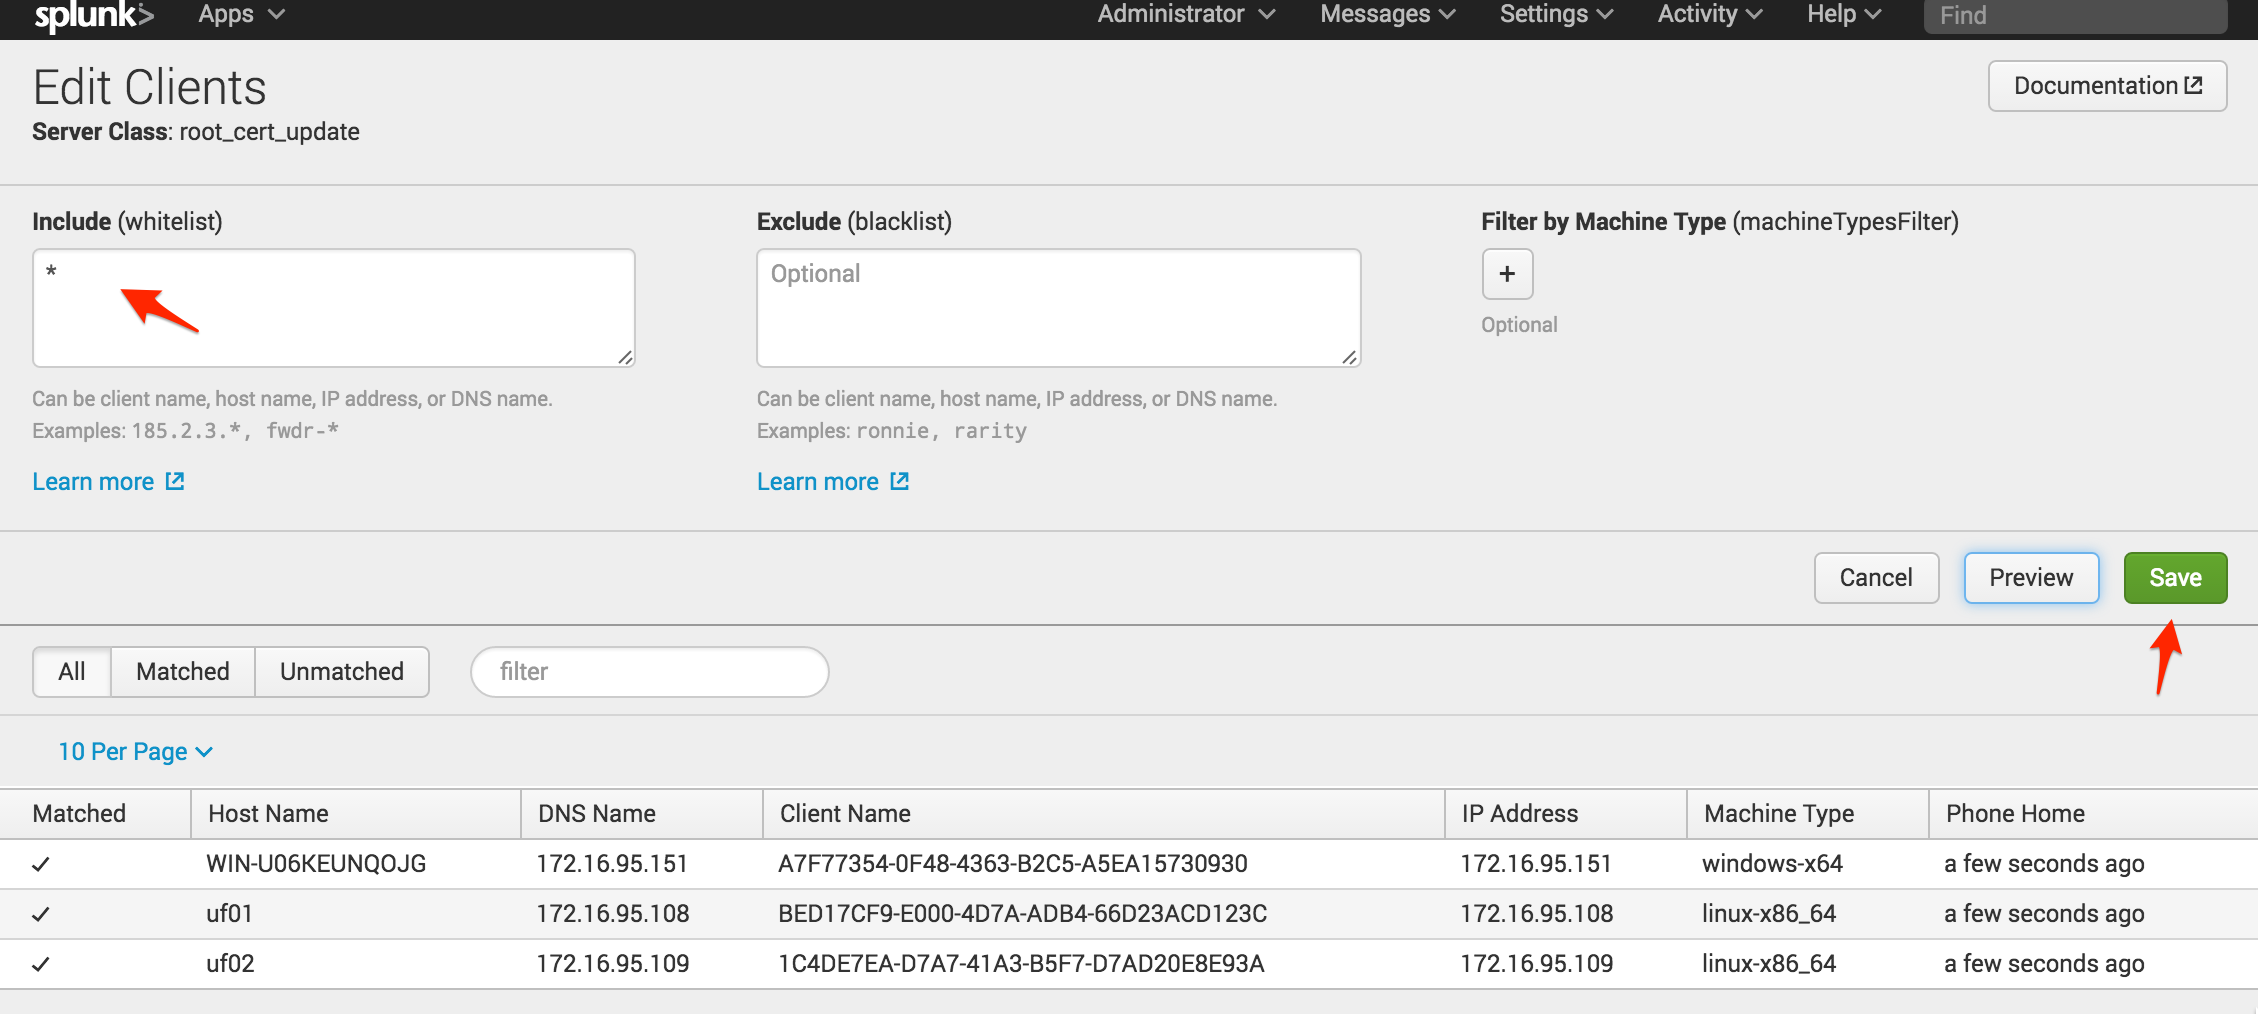
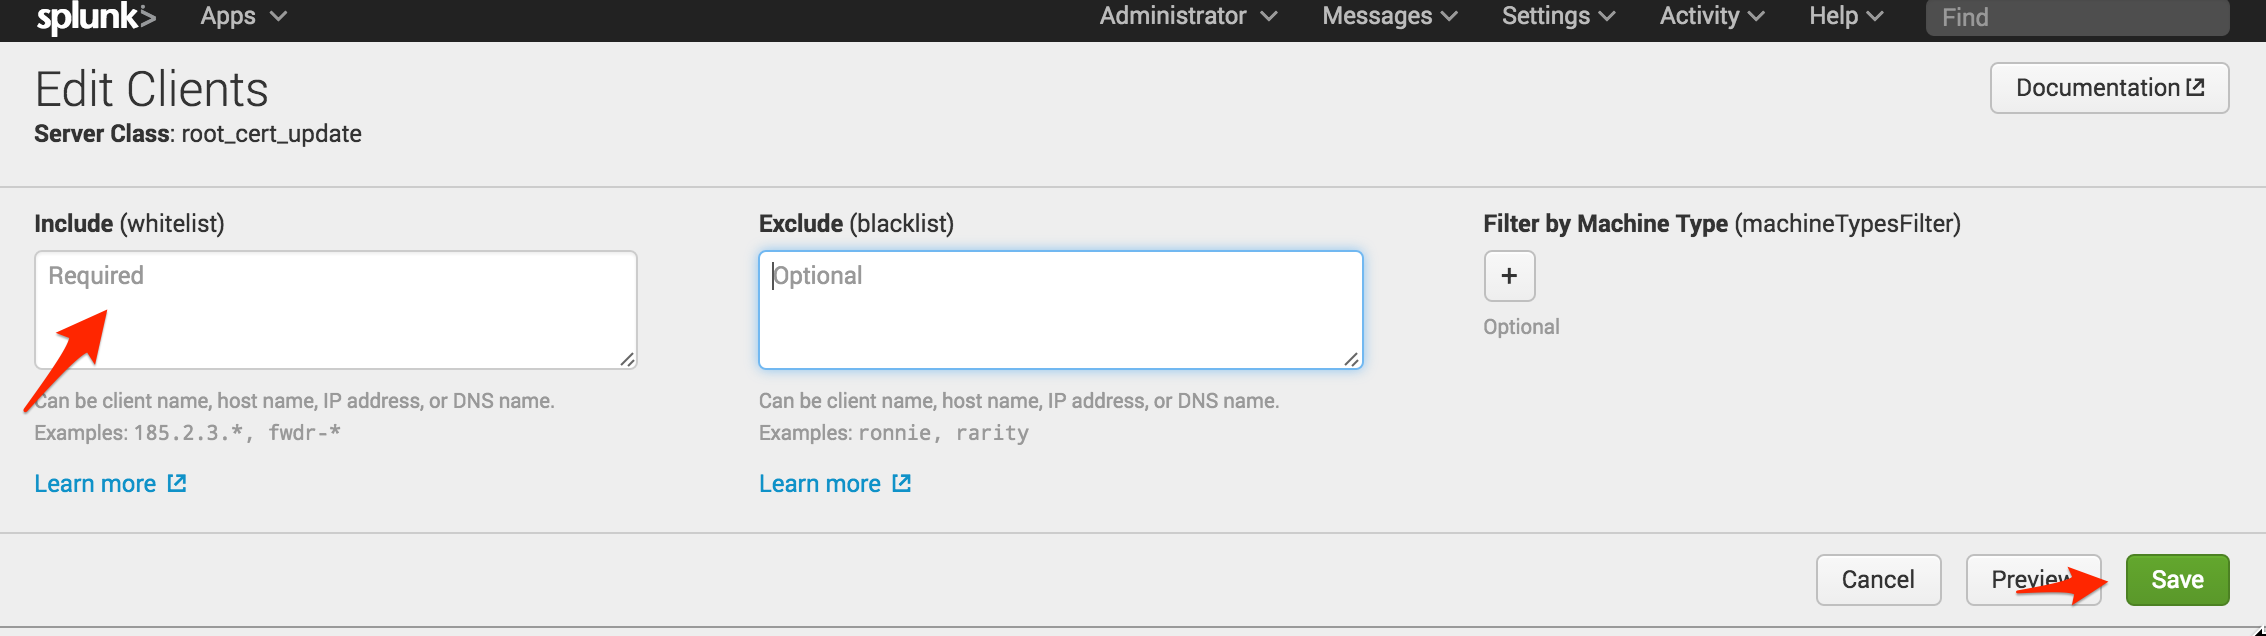
Now that the set-up of the server class is complete you can add the clients. On the Forwarder Management screen select “Edit Clients” for the new server class. The screenshots below are from a lab environment, so we whitelisted all of our clients by using a *. In a production environment, make sure you test your application using only a handful of clients. Worst case, you may need to manually remove the new app if it causes problems on each client. After specifying your whitelist, click “Save.”
The new app is now being deployed to the clients specified. Give Splunk about 5 minutes to deploy the app and restart the Splunkd process. If you recall, inputs.conf was configured to execute the script every 5 mins. The first time the script is executed it will update the default root certificate. Every time after, assuming there were no issues, the script will attempt to run and exit with an error message “is already a renewed Splunk certificate.” You can use this error message as a way to monitor which clients have had their root certificate updated.
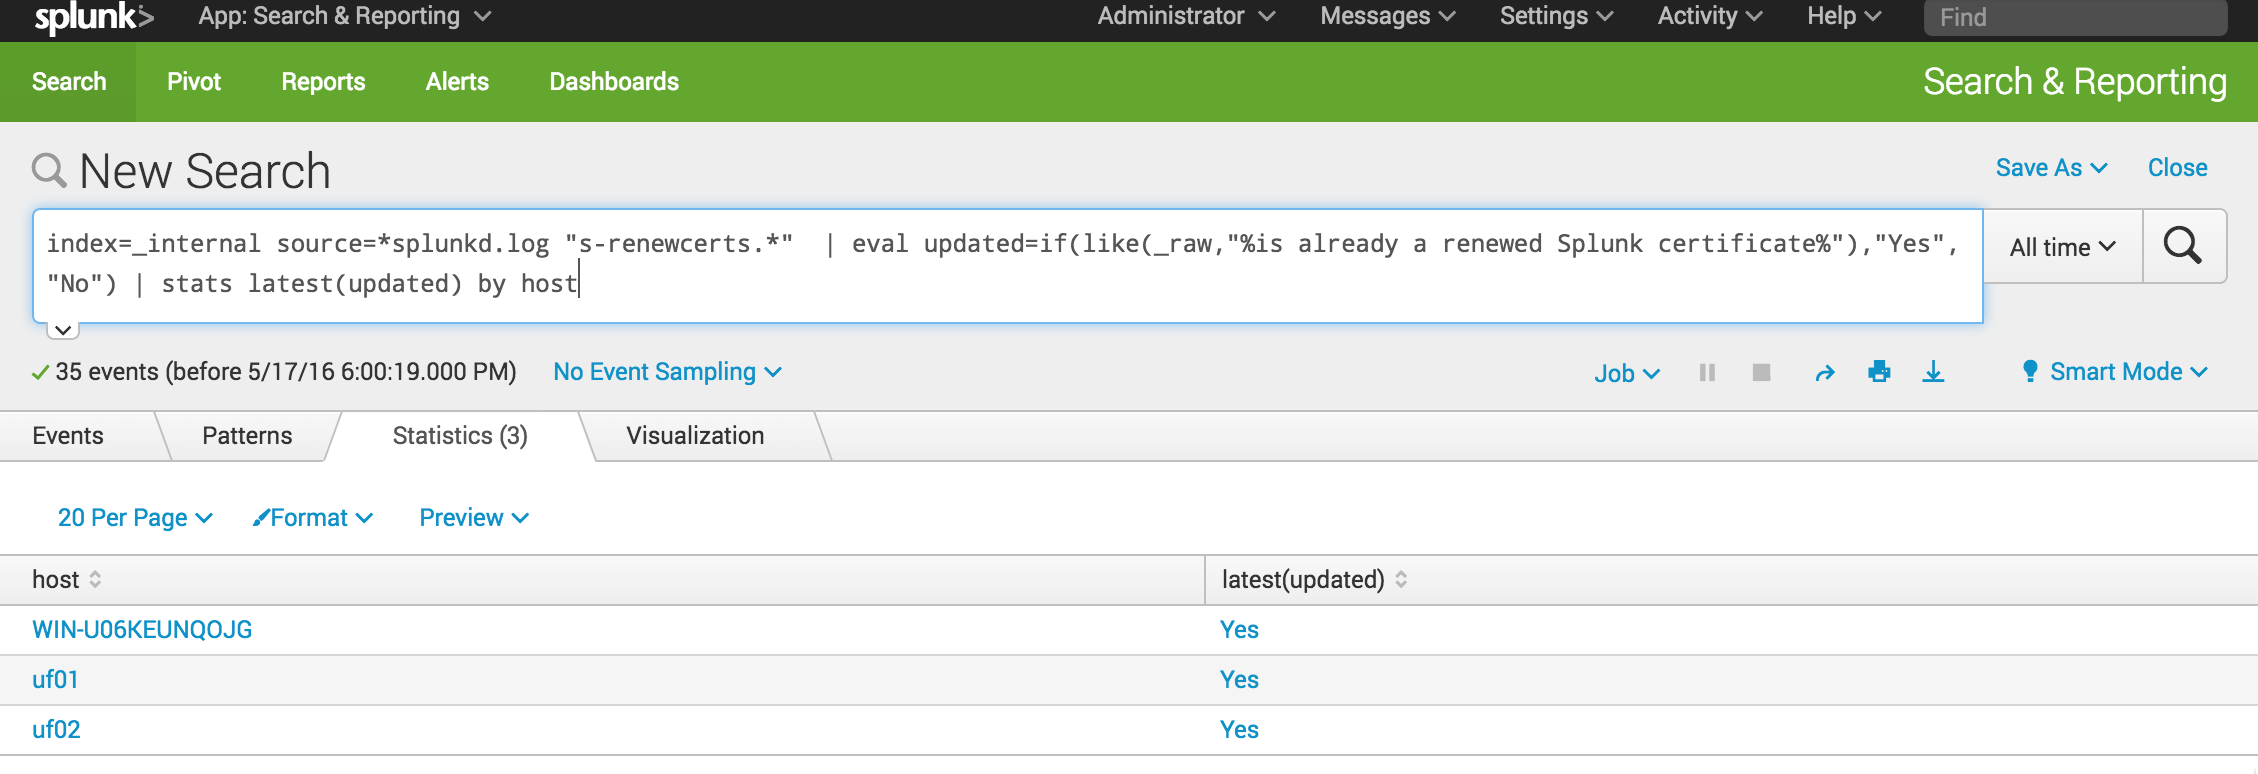
You can use the search head to check after giving Splunk adequate time to deploy and execute the script. The search queries the _internal index and splunkd.log for any message related to the “s-renewcerts.*” script. In our example, we used a wildcard since we have three extensions, .sh for Linux and .cmd and .ps1 for Windows. Our eval statement searches those messages for the string “is already a renewed Splunk certificate” and creates a new field, “updated,” with the values “Yes” or “No.” Finally, we used the stats command to return the latest value of the “updated” field per each host. In our output below, you can see the script has run successfully on any Splunk instances that are clients of our deployment server.
The final step is to remove the app from all the clients. Splunkd also requires a restart to use the new certificates. By removing the * from the whitelist and clicking “Save,” the deployment server will remove the app from all clients and trigger another restart. You could automatically trigger a restart of the client in the script using some workarounds, but that could cause a restart loop on the client if there is an error. Better to play it safe.
I hope you enjoyed this blog post. Now you know how to leverage the deployment server to deploy scripted inputs that don’t collect data, but allow you run scripts to modify any files that the Splunkd process has permission to access. This is an efficient technique to address Splunk’s Product Advisory and update all your default root certs without bothering your system admin team.
Luke Netto is a Splunk Consulting Engineer with GTRI’s Professional Services.